Saturday, January 9, 2021

Dynamic Environment (WIP)

As a Tech Artist, I want to be able to enhance concept art, so for my 2020 Tech Art final, I began creating a dynamic environment in Unity.  This project is still a work in progress as I learn to enhance and refine my work.
Currently I have a Day/Night Cycle in place, using a directional light for the sun and a point light for the moon.  

The position of the moon is calculated using the 2D rotational formula which utilizes sine and cosine to rotate a “point” around unit circle. *hit play* This is then modified by a scalar value (customizable by the user) to set the distance of the moon from the scene’s origin.  
The sun is simply rotated about the x-axis. Currently the duration of the day is a 24-hour/24-second day, making the rotation angle 15 degrees (360 / 24).


The dot product is used to increment the light intensity of the moon and sun as they head towards their apex, then decrementing them as they reach the horizon. It is also used to set the sun’s color gradient (to simulate sunrise/sunset).

I also wanted the sprites to cast and receive shadows, so through research I discovered that this could be accomplished by 1) turning on the ability of the sprites to cast and receive two-sided shadows via a small script, and 2) writing a shader that allows shadows to be cast and received.  I also added the ability to take normal map information to make the 2D art respond to the light. 

<video here>

I also have a particle effect in place to simulate rain in the environment.  I plan to make the rain volumetric instead of 2D and add in effects such as clouds and lightning to improve the feel of the storm.

<video here>

This is just a static test scene, and while I’d like to build it up more (though I certainly enjoyed making an homage to the classic Disney cartoon The Gummi Bears), what I would really like to do is be able to take these tools and implement them in an animated 2D scrolling scene.

This image is from a scene I made and animated in Photoshop and Premier and posted previously in this blog. The interior is currently static, while different assets pass by in the background. I would like to take this to unity, implement parallax scrolling, and figure out how to utilize the lighting and effects I’ve created as seen through a train window.


The shader used to create my normal maps and 2D shadows was inspired from shaders created by anlev on github and WrongTarget on the Unity forums. 


Thursday, January 7, 2021

Doggy Vision Shaders

During one of our two-week Rapid Prototype Rounds with the theme of "storytelling", the team I was part of created the game, Campward Bound: The Incredible Journey, the story of a lost dog trying to find their owner.
Since we were playing as the lost dog, I proposed we try and make it feel like the player is looking through the eyes of the dog.  This would not only add to the storytelling element, but also made the core mechanic a bit more challenging since you are seeing things like a dog would.
Below is a before and after of a test scene in Unity that I set up while building my effects:


Since dogs are nearsighted, I altered the depth of field, and the "smell-o-vision" is represented by a particle effect that is untouched by the post-processing shaders. The Depth of Field effect is also customizable in the inspector.
As dogs also have limited color vision, I wanted to find a way to mimic this effect with another post-processing shader placed on the camera that tinged all the values in the scene with a greenish hue.
Below you see the same test scene, with all the "Doggy Vision" shaders in action:


Shader inspiration comes from Catlike Coding.

Tuesday, November 10, 2020

3D : Canon

While we've separated into separate tracks now, and I plan on pursuing Tech Art, I am still interested in continuing with 3D as long as time allows. Similar to the previous assignment, the crate, this is another multi-week assignment that will end in the creation of a real-time game prop: a canon, set up in a small diorama-like scene.

As I plan on following along with the tutorials with little to no deviation, I am using Nick's reference board going forward with my canon creation.


My personal favorite was this slightly squashed cannon, so I plan on modeling mine more closely to this style.

As we were also tasked with creating a small environment, I opted to add in some palm trees and tall grasses, similar to what you see here.

WIP

WIP with added foliage and mannequin for scale.

Lo Res cannon with wireframe.

Lo Res cannon.

Hi Res cannon with wireframe

Hi res cannon.

WIP sculpt in Zbrush

Tuesday, November 3, 2020

Animation : Jumping

While we've separated into separate tracks now, and I plan on pursuing Tech Art, I am still interested in continuing with animation as long as time allows. As a result, this is a multi-week pass at a basic jump, again using a rig of your choosing. 


First pass.

Second pass.

Third pass.

Thursday, October 15, 2020

Common : Dealer's Choice

For this week's assignment we really weren't given much of a structure for the assignment aside from takg into consideration the concepts and values we learned in the previous week.

As as result, I took it upon myself to create something I've been wanting to do for awhile now: My own personal lofi hip hop radio.

While I didn't complete the project to my satisfaction due to time constraints (thanks industry review!), I will definitely revisit it as it's something I really enjoyed making.


Inspiration.

Final (for now) result.


Tuesday, October 13, 2020

Animation : Walk Cycle

We were tasked with creating a basic walk cycle, working with either a basic boney or basic beefy rig.

Basic walk cycle poses.

First pass.

Second pass.

Third pass.

Final pass.

Monday, October 12, 2020

3D Art : Basic Real-Time Prop

In this multi-week module, we are creating a basic real-time prop for a game - in this case a crate. We will be taking this crate through the proxy, game and high resolution modeling phases.

Proxy crate in Maya with mannequin for scale.

Proxy crates imported to UE4.

WIP building a wall of boards to make a higher-resolution crate.


High-res crate ready for export.

Crate in Zbrush ready for sculpting,

Finished sculpt.

Decimated crate for export.
Test for resurfaced lid in Maya.

High res and low res crates in Maya.

Low res UV maps.

Lo res model in Substance Painter.

Crate with base color in Substance Painter.

Finished wine crate, ready for export.

Normal map in Photoshop.

Crates in UE4.


Final result.


Thursday, October 8, 2020

Common Art: Perspective

 This week we were tasked to do the following:

  • Generate at least four buildings in Maya with which to populate a city.
  • Populate a Maya Scene File with the buildings created - additional kit bashing was permitted.
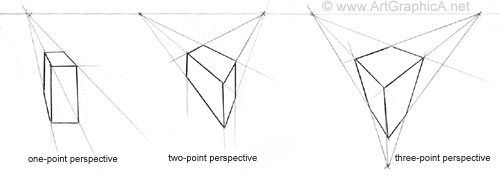
  • Build shots for one-, two- and three-point perspectives.
  • Choose our favorite shot, then render it with Arnold and composite it in Photoshop.
Examples of the different perspectives.

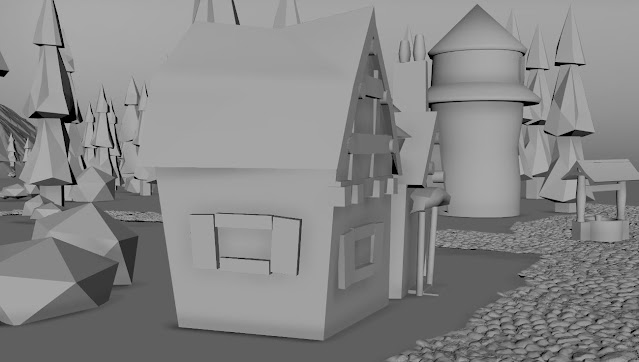
Instead of a traditional cityscape, I wanted a more Disney inspired village.

Buildings created in Maya.

One-point perspective.

Two-point perspective.

Three-point perspective.

Final result.


Wednesday, September 30, 2020

Common Art : Composition

This week's assignment focused on creating a composition that draws the eye and follows a set layout. We were giving the same basic kit bashing file with models created by Nick Zuccarello, and then given free reign to assemble them and render them how we wanted in Maya. It was also possible to add additional resources from Sketchfab (or to create your own additional assets).

1) choose composition type

2) kit bashing with the models that nick gave us - can change size, etc. use every element in maya file

can also photo bash and incorporate other photos, etc.

change shape of mannequin (not t-shape)

3) render (and paint out) -- already set to render toon lines (contour filter and ai tune shader)

aiRaySwitch in Environment (render settings) to make background white?

4) can find other models/add stuff to scene (sketchfab?)

5) think about fore- mid- background (and lighting scenarios)

6) find image and artist for reference where you like color harmonies

**required resolution: 3840x2160**

Composition guidelines.

Layout reference image.

Based on the props, I decided to create a little "small village" meets Blade Runner vibe.

Scene with kit bashing assets (and additional assets from Sketchfab) set up in Maya.

Example of Toon and Occlusion renders in Photoshop.

WIP

Final scene in Photoshop.

Thursday, September 24, 2020

Common Art : Lighting

This week, we were given three busts created by Nick Zuccarello and given the challenge to display them based with three-point lighting in Maya. Once the busts had been rendered, we also took the Lego models we made in 3D, imported them from UE4, and rendered them with the same lighting set up in Maya. 


   My Lego rocket built in UE4 and then rendered in Maya with my three-point lighting.


Search This Blog